Sign up for uno
Language
Overlays add a professional touch to your live stream, but controlling them in real-time can be a lot for one person to juggle. Building a Stream Deck setup with the best Stream Deck plugins can help. For example, uno’s free Stream Deck plugin allows streamers to control our online overlays with just the press of a button. Here are some of our Stream Deck tips and tricks to help you get started.
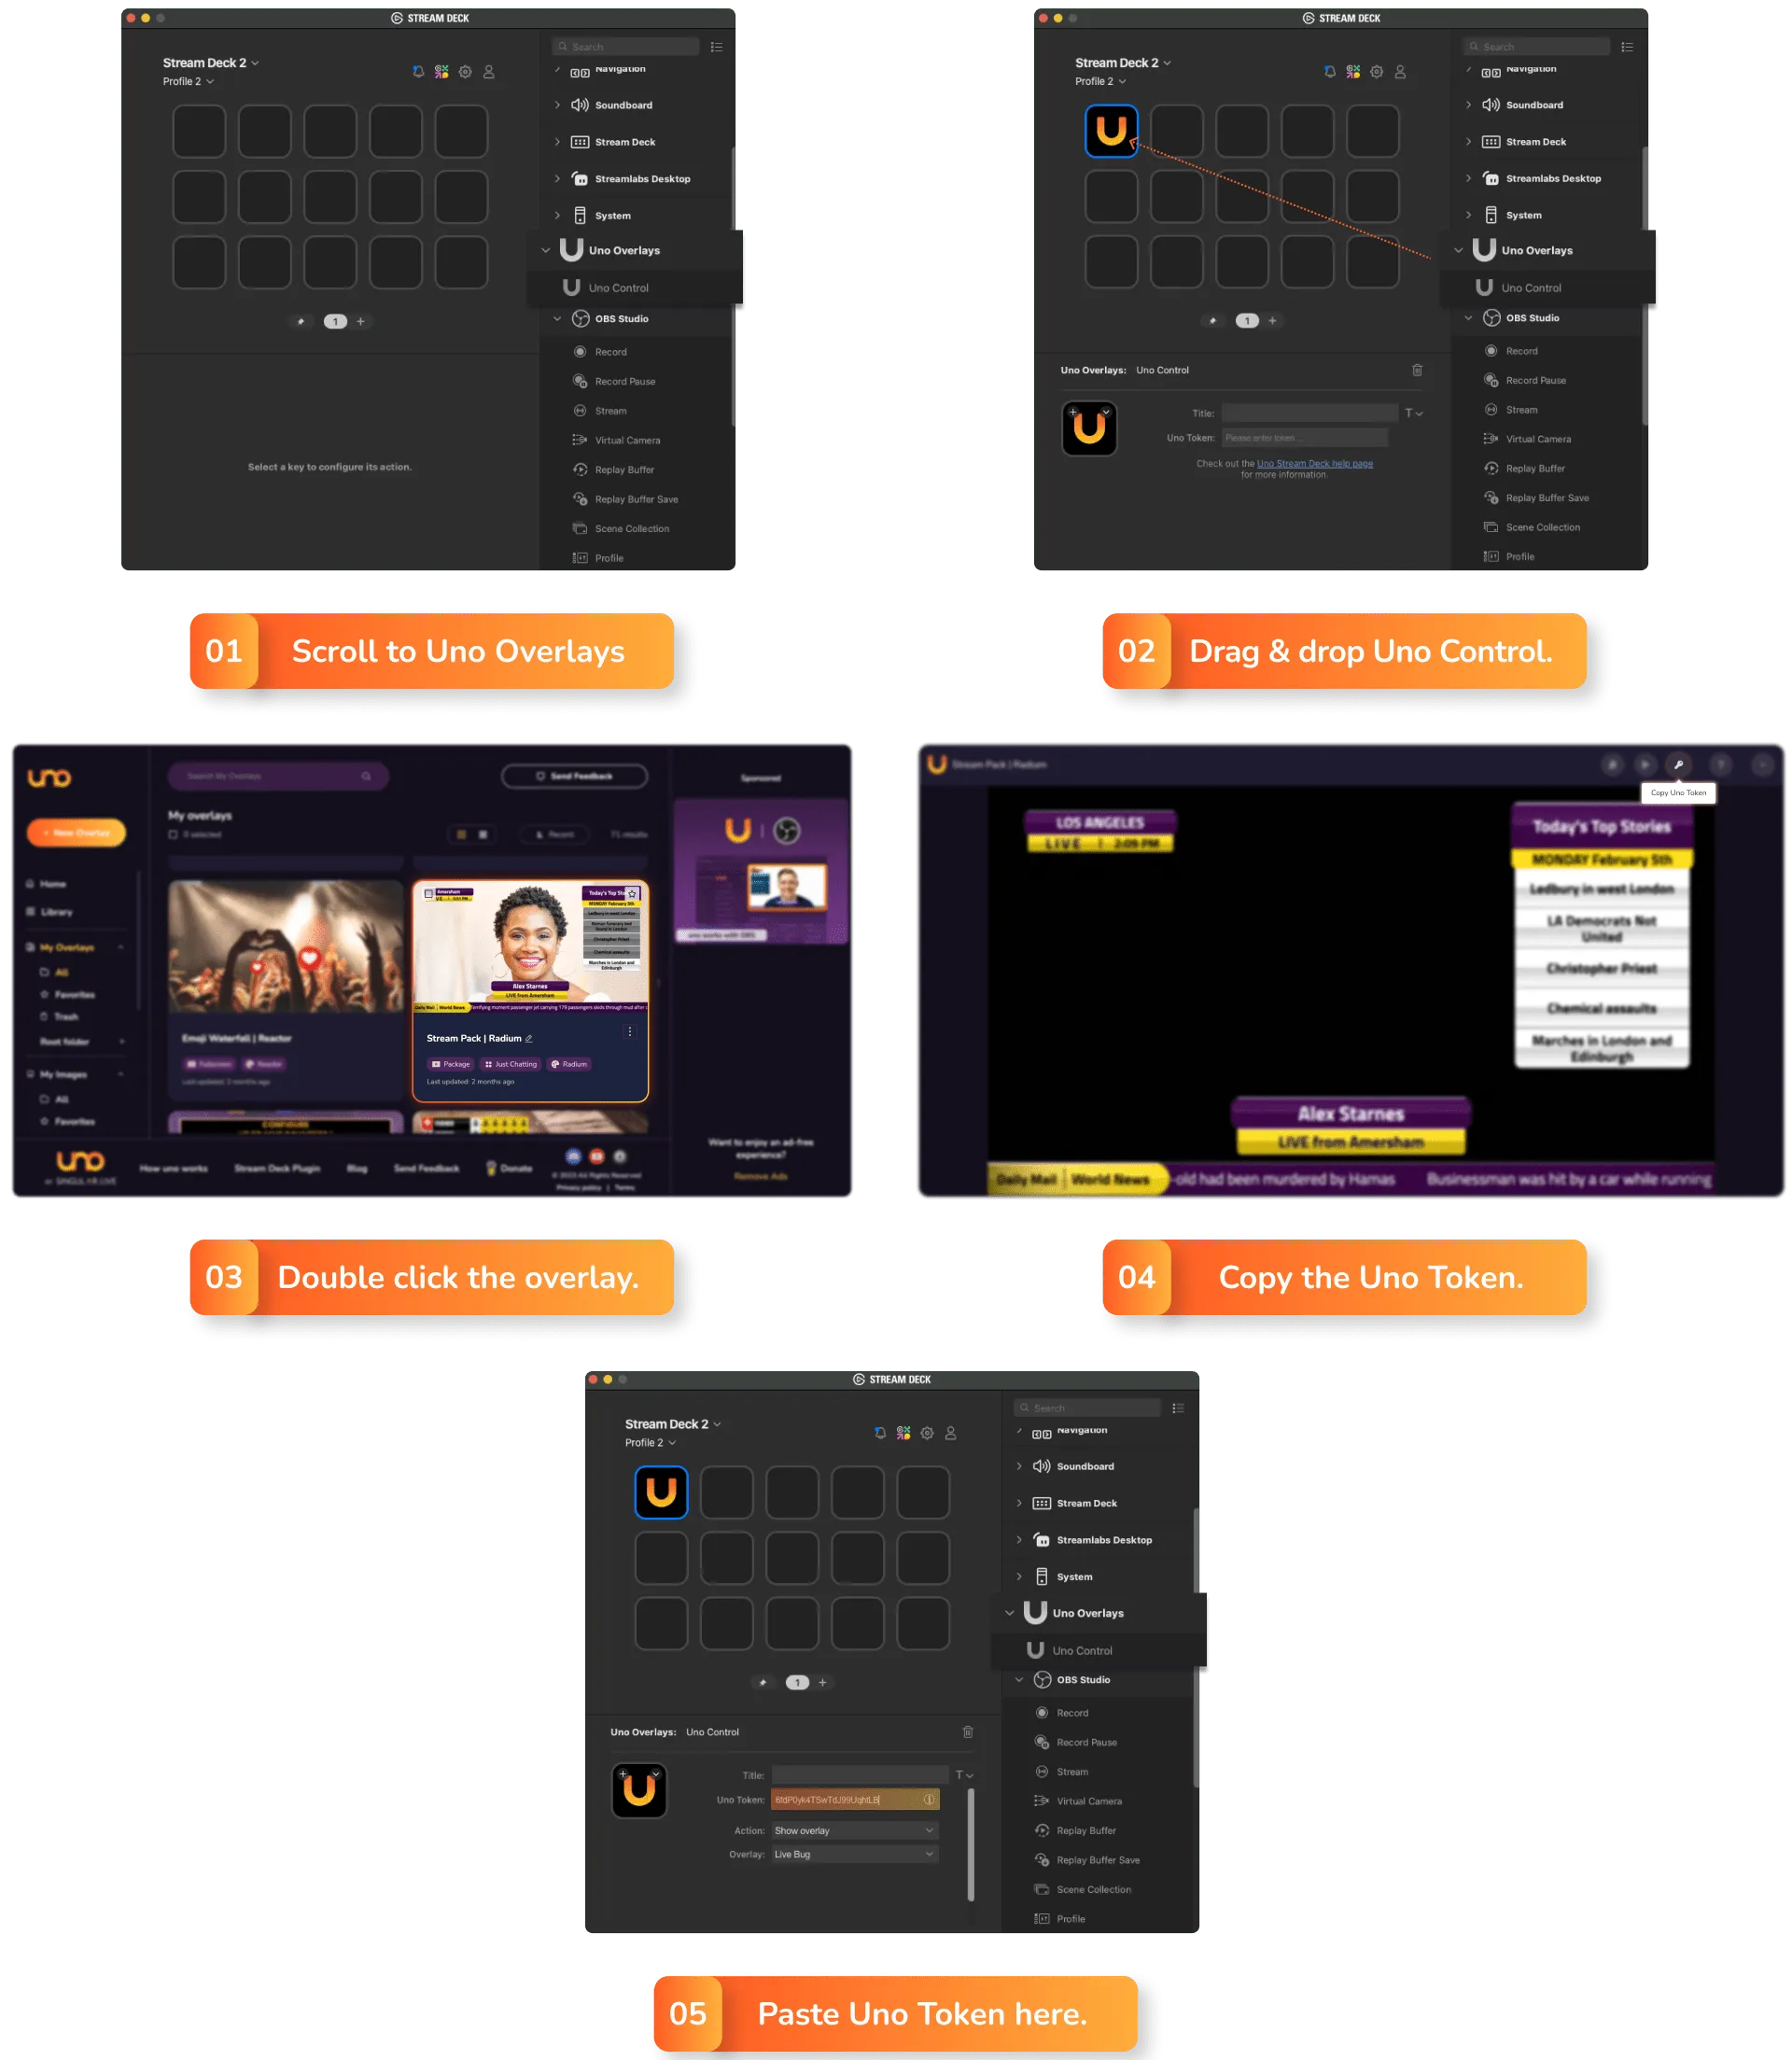
You can program your Stream Deck to control a wide variety of functions in any of our overlays with the Uno Control function. Connect a Stream Deck key to one of our overlays with these simple steps:
1. In the Stream Deck app, scroll down the category dropdowns to the Uno Overlays category.
2. Drag the “Uno Control” action into an empty key.
3. Log in to overlays.uno and go to My Overlays. Double click the overlay you want to open the online interface.
4. At the top right corner of your screen, click the key symbol to copy the overlay’s Uno Token.
5. In the Stream Deck app, paste the Uno Token into the Uno Token field.
Now you can customize each Uno Control key to control and swap between various streaming elements in our overlays. You can also customize your icons using our free Stream Deck icons.
Tip: you can always save time when adding more functions for the same overlay by copying your first button and pasting in a free button. You can then change the action you want the copied button to perform without having to go through all the steps of re-creating an Uno Control key.
Once you’ve created a BRB or Starting Soon screen using our free overlays, you can hook up your Stream Deck to control the countdown overlay. Here’s how to create a set of Uno Control keys that start, pause, and reset the countdown timer:
1. Create a new Uno Control key using the Uno Token from the countdown overlay interface.
2. In the Action dropdown menu, click on “Play timer”.
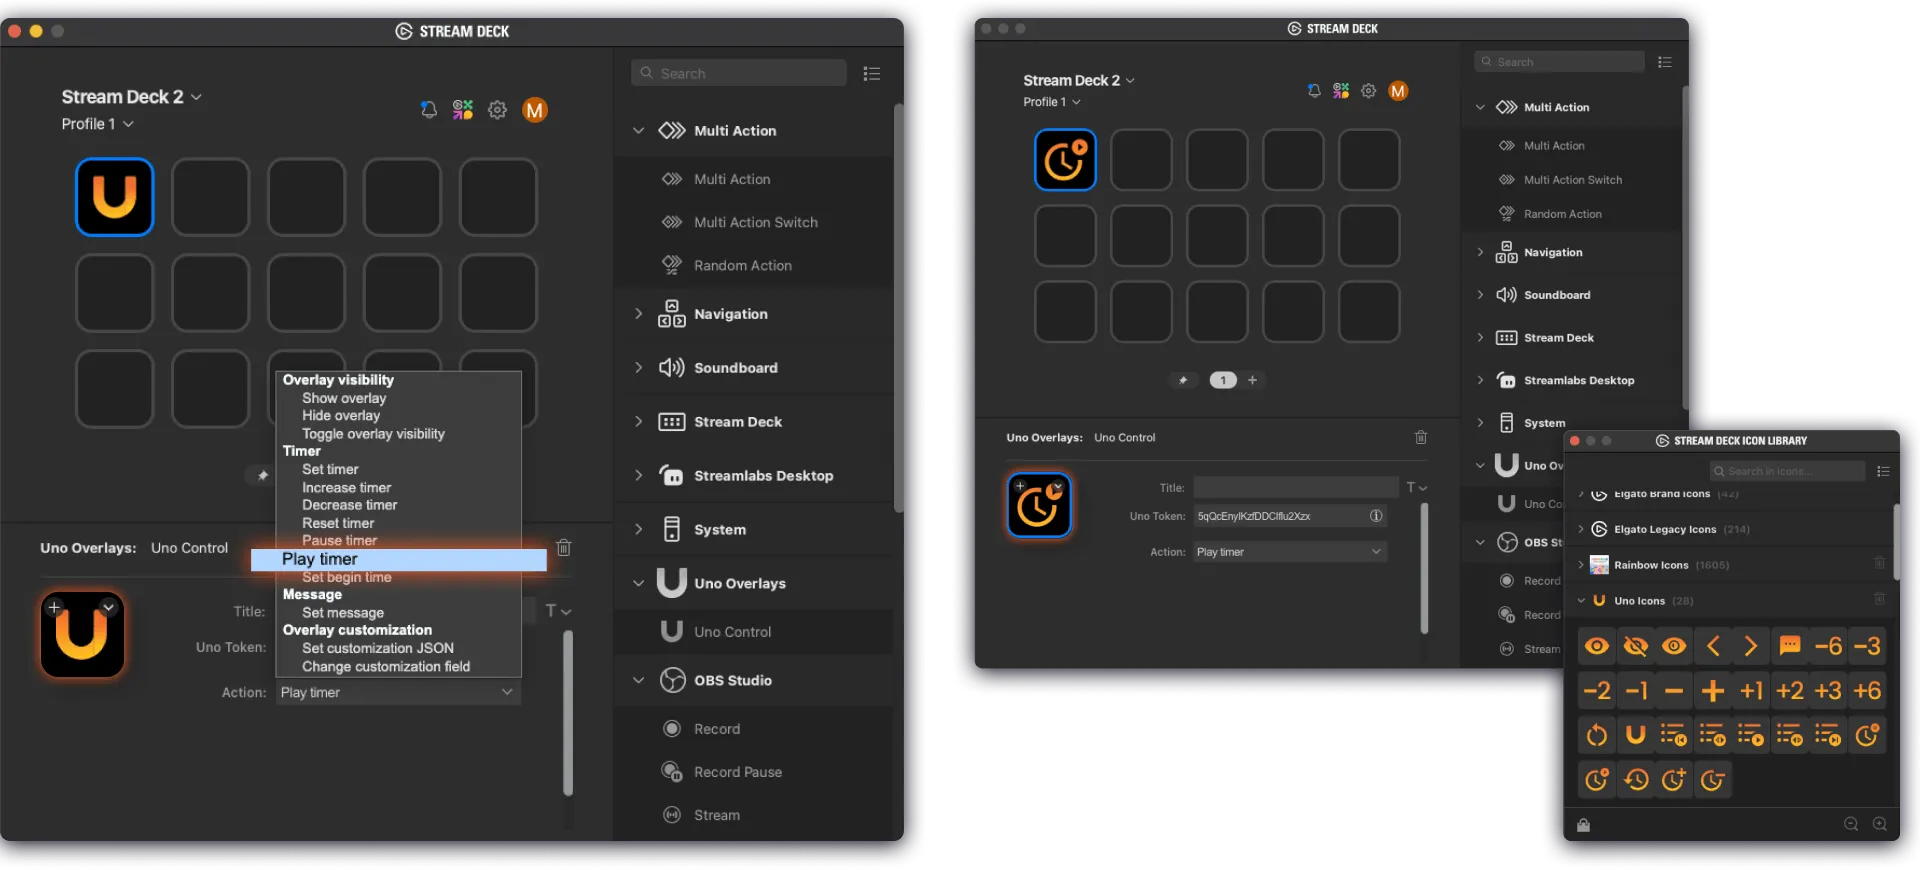
You now have a Stream Deck key that starts the countdown timer.
3. Right click on the start key and click “Copy”.
4. Right click on an empty Stream Deck key and click “Paste”.
5. In the Action dropdown menu, click on “Pause timer”. This creates a key that pauses the countdown overlay.
6. Copy and paste the pause key into an empty Stream Deck key.
7. In the Action dropdown menu, click on “Reset timer”. This creates a key that resets the countdown timer.
Stacking multiple overlays in OBS Studio allows for maximum customization, but it can be a lot of work – especially if you want to get your live stream up and running with minimal fuss.
Uno stream packs each have several overlays that you can customize, edit, and control through one interface. But if swapping back and forth takes too much time, it can be handy to use a Stream Deck to control all your different overlays.
Here’s a step-by-step guide on how to set up an Uno Control key that launches one of the overlays in your stream pack. In this example, we’re using the Palladium-themed Stream Pack.
1. Create a new Uno Control key using the Uno Token from the Stream Pack overlay interface.
You will see that the stream pack has an additional Overlay dropdown field. This contains a list of all the different overlays in the stream pack, for example, the live ticker, social bug, and talking points.
2. Select the overlay you want to control from the Overlay dropdown menu. For example, if you want the Uno Control key to control the Live Ticker, click on “Live Ticker”.
3. In the Action dropdown menu, select your desired action. For example, if you want the Uno Control key on your Stream Deck to display the live ticker, click on “Show overlay”.
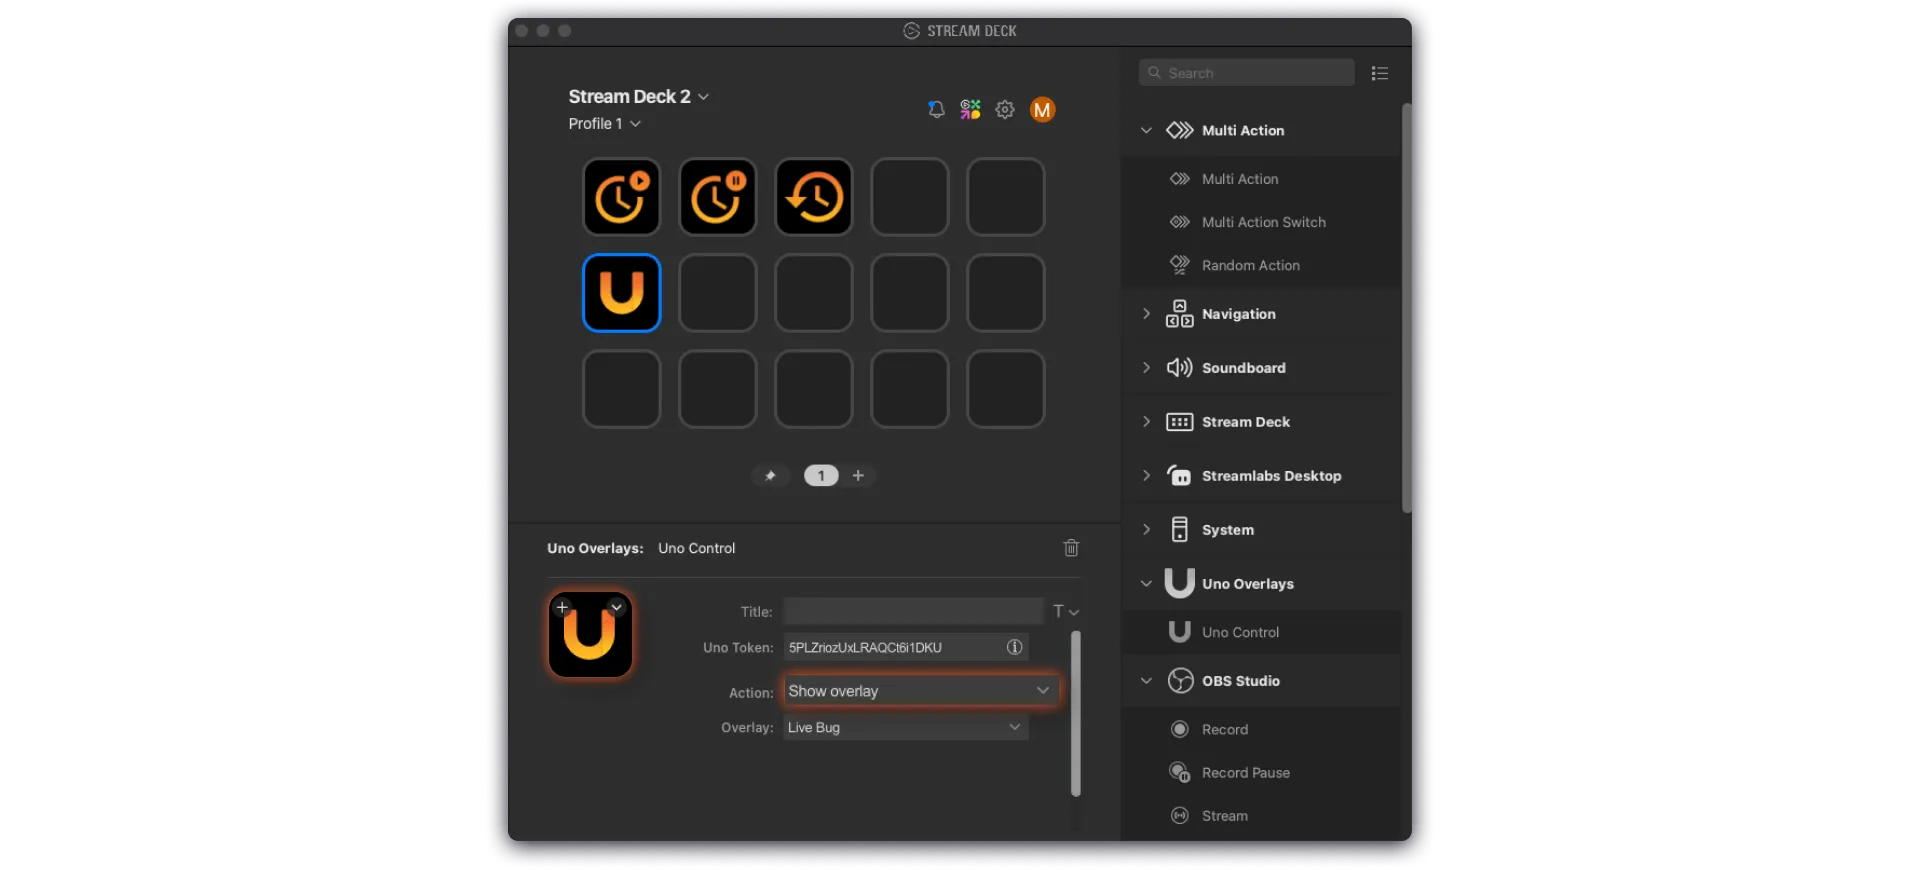
If you want to change ticker messages for different segments of your live stream, you can program keys on your Stream Deck to swap between overlay slots.
What are slots? Slots are different versions of the same customizable overlays that you can create in the uno overlay interface. These allow you to swap between different versions of an overlay without having to live-edit.
This might be helpful if, for example, you have different guests appearing on your show and want them each to have their own name and graphics. You can also use slots to set up the colors and names of different competing sports teams that you regularly broadcast.
Here’s how to create a new slot in your ticker overlay:
1. In the stream pack overlay interface, click “Ticker” on the menu bar.
2. Click on the bullet point list icon on the top right of the Ticker controls to access the Slots panel.
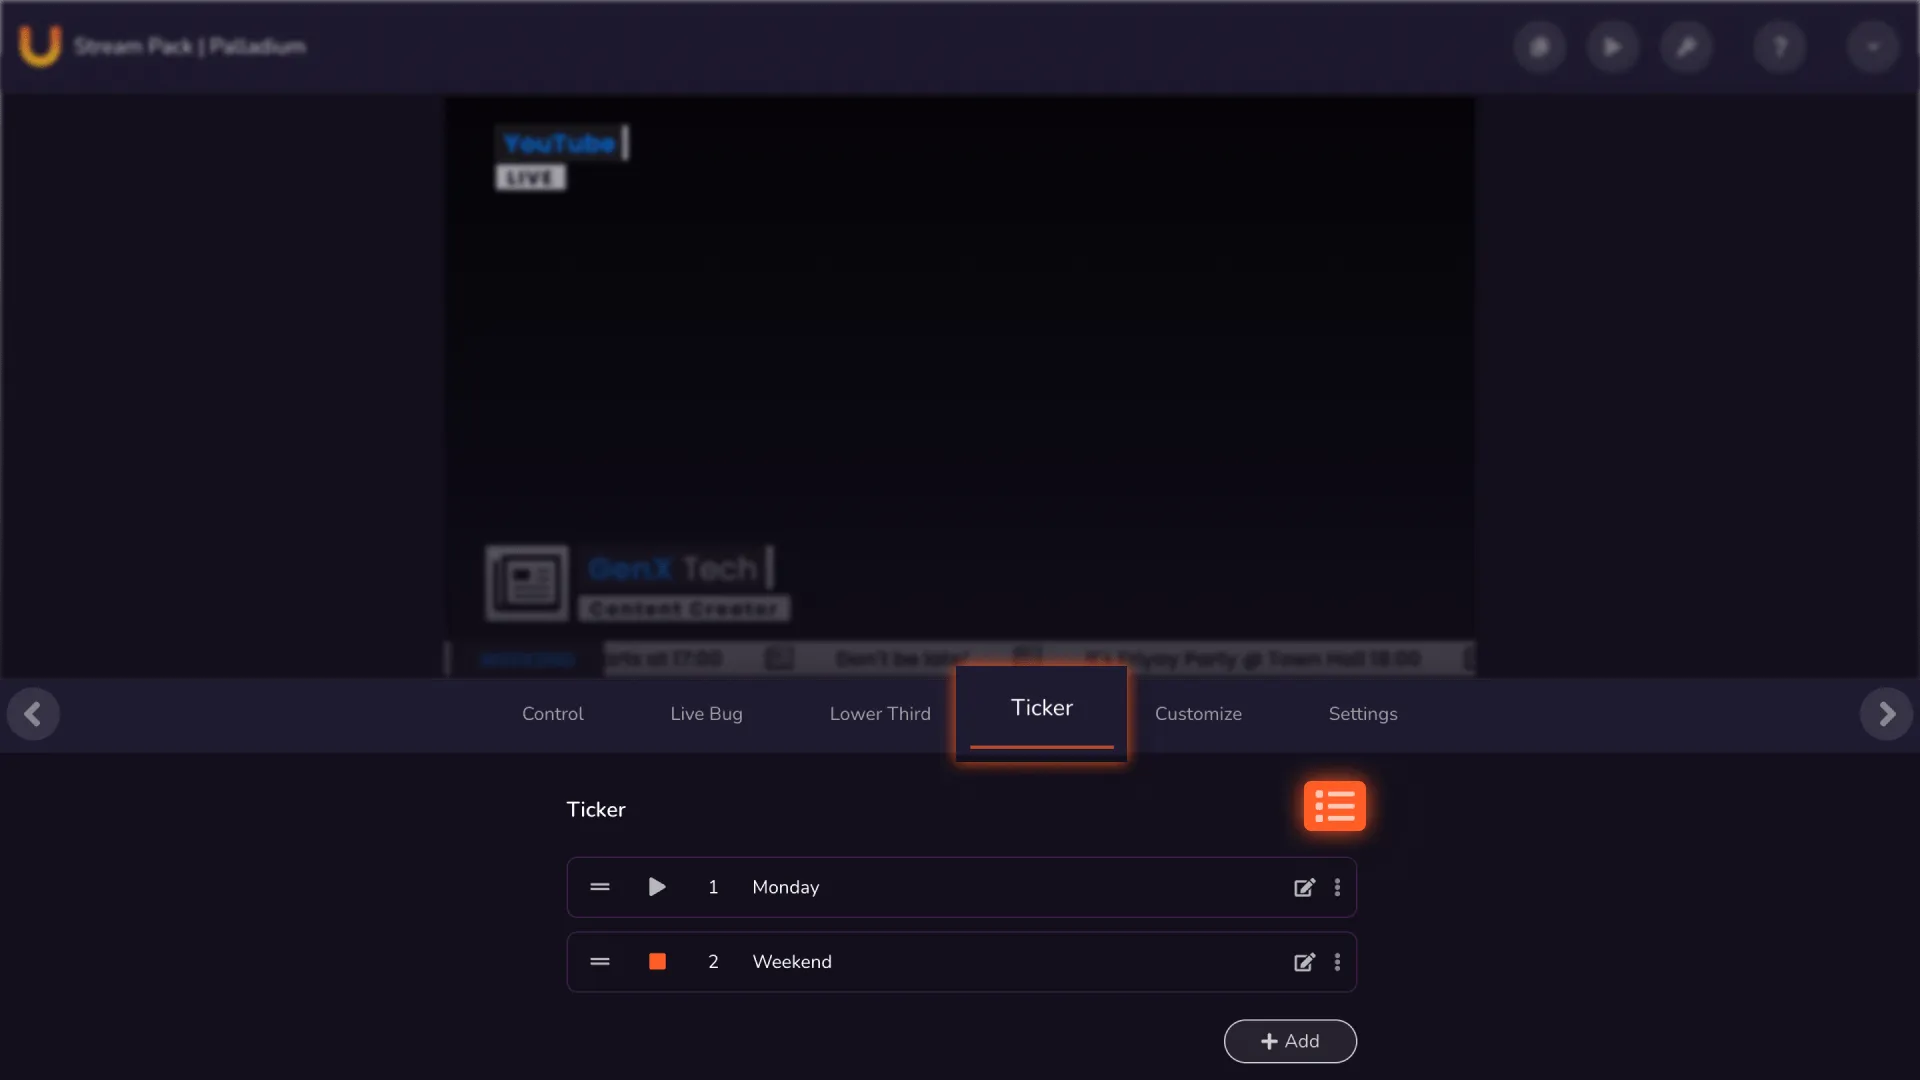
3. Click on the +Add button to create a new slot.
4. Rename the slot by clicking on the slot name.
5. Click on the pencil icon to edit the title, messages, separator image and more.
Once you’ve created a new slot, here’s how to connect it to an Uno Control key:
1. Create a new Uno Control key using the Uno Token from the Stream Pack overlay interface.
2. In the Overlay dropdown menu, click on “Live Ticker”
3. In the Action dropdown menu, click on “Slot by name”.
4. In the Value text box, type the ticker slot name into the Value text box.
You can also just transition to the next slot in your list by clicking on “Next slot” on the Action dropdown menu.
If you want to launch your countdown overlay and start the clock with the press of a single Stream Deck key, you can stack Uno Control functions in the Stream Deck app’s multi-action feature.
For example, here’s how to program a Stream Deck button that shows and starts the timer in our Spartan-themed Game Frame overlay:
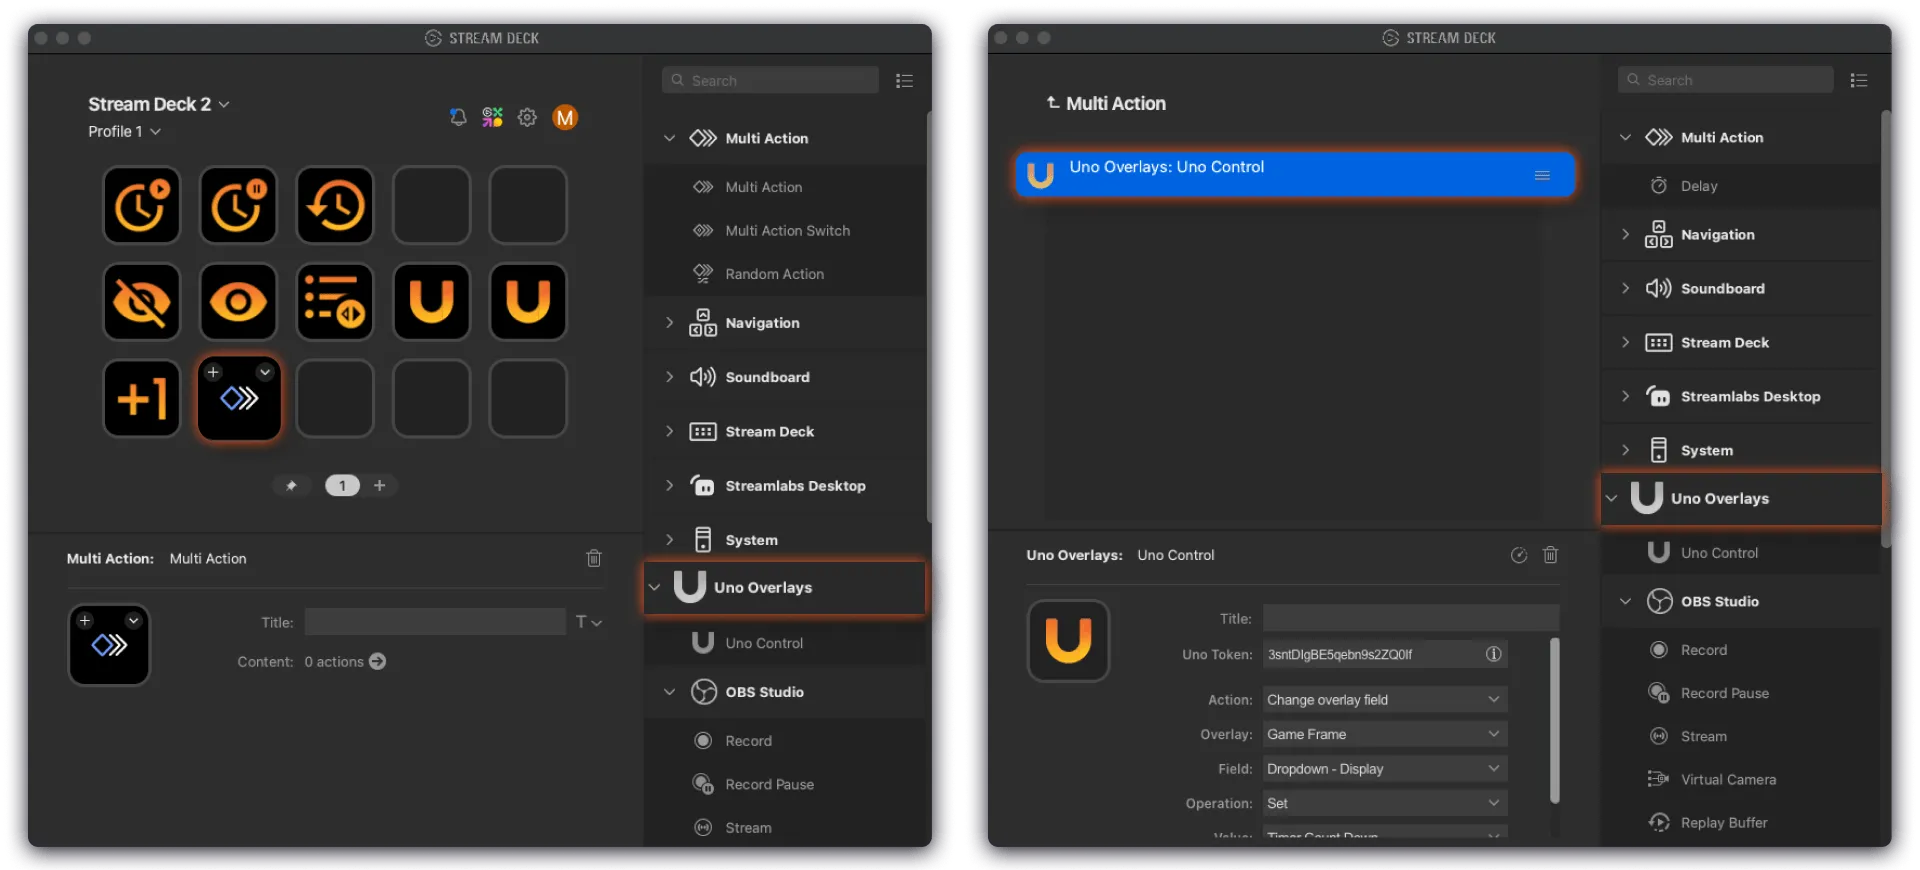
1. In the Stream Deck app, open the category dropdowns, and find the Multi Action category.
2. Drag and drop the Multi Action function from the Stream Deck category menu to any empty key. The Multi Action panel should appear on the Stream Deck app.
3. Scroll down the category dropdowns to the Uno Overlays category.
4. Drag the “Uno Control” action into the Multi Action Panel.
5. Copy the Uno Token from the overlay interface on overlays.uno and paste it into the Uno Token text box.
6. In the Action dropdown menu, click “Change overlay field”.
7. In the Field dropdown menu, click on “Dropdown - Display”.
8. In the Value dropdown menu, click on “Timer Count Down”. You have now created the first action in the Multi Action key.
9. Right click the first action in the Multi Action panel and click “Copy”. Paste the action in the panel below.
10. In the Field dropdown menu, click on “Timer Control - Timer Control”.
11. In the Value drop down menu, click on “Start”.
The numbered order of the actions in the Multi Action panel is the order that the actions will be carried out when you press the Stream Deck key.
You can program each button to perform a sequence of actions, for example hiding your BRB screen and launching your streaming scene on OBS. You can also add a time delay between each scheduled action in the multi-action button.
Our live overlays are designed to fit multiple functions and are fully customizable in real time, so there is no real limit to how you can use them. This means that you can customize each button to perform any number of functions using our Stream Deck plugin. Feel free to play around and make mistakes, or reach out to us and our community of streamers on Discord for more advice.