Recursos
Want to take your news live stream, sports broadcast or live podcast to the next level? The Bitfocus Companion Stream Deck plugin allows pro streamers to access more control over uno overlays, while managing the equipment you need for complex live streams.
You can integrate any uno overlay into Companion by setting up the REST API and adding the payload from the Singular App.
However, if you aren’t using the Singular App, you can also add the payload from any uno overlay using a generic HTTP connection. Each uno overlay has a unique API tailored to its specific functionalities (what we call the Uno App API).
Here’s how you can set up controls on Bitfocus Companion using Uno App API.
1. Download the latest version of Bitfocus Companion and install it on your PC.
Note: if you are working on MacOS, you may have to bypass some additional security warnings. We suggest you right-click on the Companion DMG file and click Open.
2. A small control window should open. Click the “Launch GUI” button.

Now you can set up the REST API by adding the Generic HTTP Requests Connection.
3. Make sure you are in the Connections tab in Bitfocus Companion. Under the +Add Connection tab, type Generic HTTP into the search bar. Then, click the “Add” button.

4. Configure the connection and make sure the Label is something you’ll recognize later.

Note: You can leave the Base URL field empty for now. You can define REST endpoints later when you define buttons.
4. The Singular-API connection should appear under your Connections tab. Enable the HTTPS connector by clicking on the toggle next to the Singular-API connection.

All Uno App APIs use the PUT HTTP method without authentication.
In this guide, we’re using the Pyrite-themed Stream Pack. However, if you’re just starting out and want to test this tutorial out first, you can also use these URLs for testing:
If you’re signed into your account on overlays.uno, this is how you can find the Uno App API URL:
1. Go to My Overlays and double-click the overlay that you want to use to open up its interface.
2. Click on the “?” icon, then click on “API Description” on the dropdown menu that appears. This allows you access a comprehensive overview of the overlay’s API capabilities.

3. Locate the API endpoint.

Here’s some examples of how you can send some basic requests to the Uno App API using Postman REST Client.
To show all overlays:
1. Request method: PUT
2. Request URL: https://app.overlays.uno/apiv2/controlapps/1bccBWBDKFWNSHEo8CdhSQ/api
3. Request body:
    {
            "command": "ShowAllOverlays"
     }
4. Response  body:
 {
            "status": 200,
            "result": "ok",
            "payload": true
     }

To hide all overlays:
1. Request method: PUT:
2. Request URL: https://app.overlays.uno/apiv2/controlapps/1bccBWBDKFWNSHEo8CdhSQ/api
3. Request body:
    {
            "command": "ShowAllOverlays"
     }
4. Response body:
 {
            "status": 200,
            "result": "ok",
            "payload": false
     }

With stream packs like the Pyrite-themed Stream Pack, you can control multiple overlays in one place. You need to find a particular overlay’s ID to control it.
To find an overlays’ ID, first locate its name. For example, if you want to control different functions in the talking points, you need to identify the subcomposition with"name": "Talking Points" and find the value next to "id".

You can then display the talking points by taking the following steps:
1. Set the following command and paste in the overlay ID :
    {
            "command": "ShowOverlay"
            "id" :  "paste the overlay id here"
     }
2. Add the following body:
 {
            "status": 200,
            "result": "ok",
            "payload": true
     }

Tip: To hide the talking points, change the payload to false.
Use the command "GetOverlayModels" to find an overlay, its ID, and the field you want to modify.

You can send a request that launches preset text in the stream pack’s talking points by using the Set Overlay Content command:
  {
            "command": "SetOverlayContent"
             "id" :  "paste the overlay id here"
             "content" :  {COPY AND PASTE THE PAYLOAD HERE
        }
     }

You can set just one field in the talking point (for example, the title, or talking point 1) by using the Set Overlay Content Field command. Remember to:
Por ejemplo, si quisiera establecer el título, utilizaría el siguiente comando:
  {
            "command": "SetOverlayContentField"
             "id" :  "paste the overlay id here"
             "fieldId" :   "Title",
             "value" :   "YOUR TEXT HERE"
     }

Usa el siguiente comando para añadir un incremento de +1 a la fila activa de los puntos de conversación, lo que resalta el siguiente punto de conversación:
  {
            "command": "SetOverlayContentField"
             "id" :  "paste the overlay id here"
             "fieldId" :   "rowActive",
             "value" :   "1"
     }

Consejo: Si cambias el valor a «-1" puedes resaltar la fila anterior de puntos de conversación.
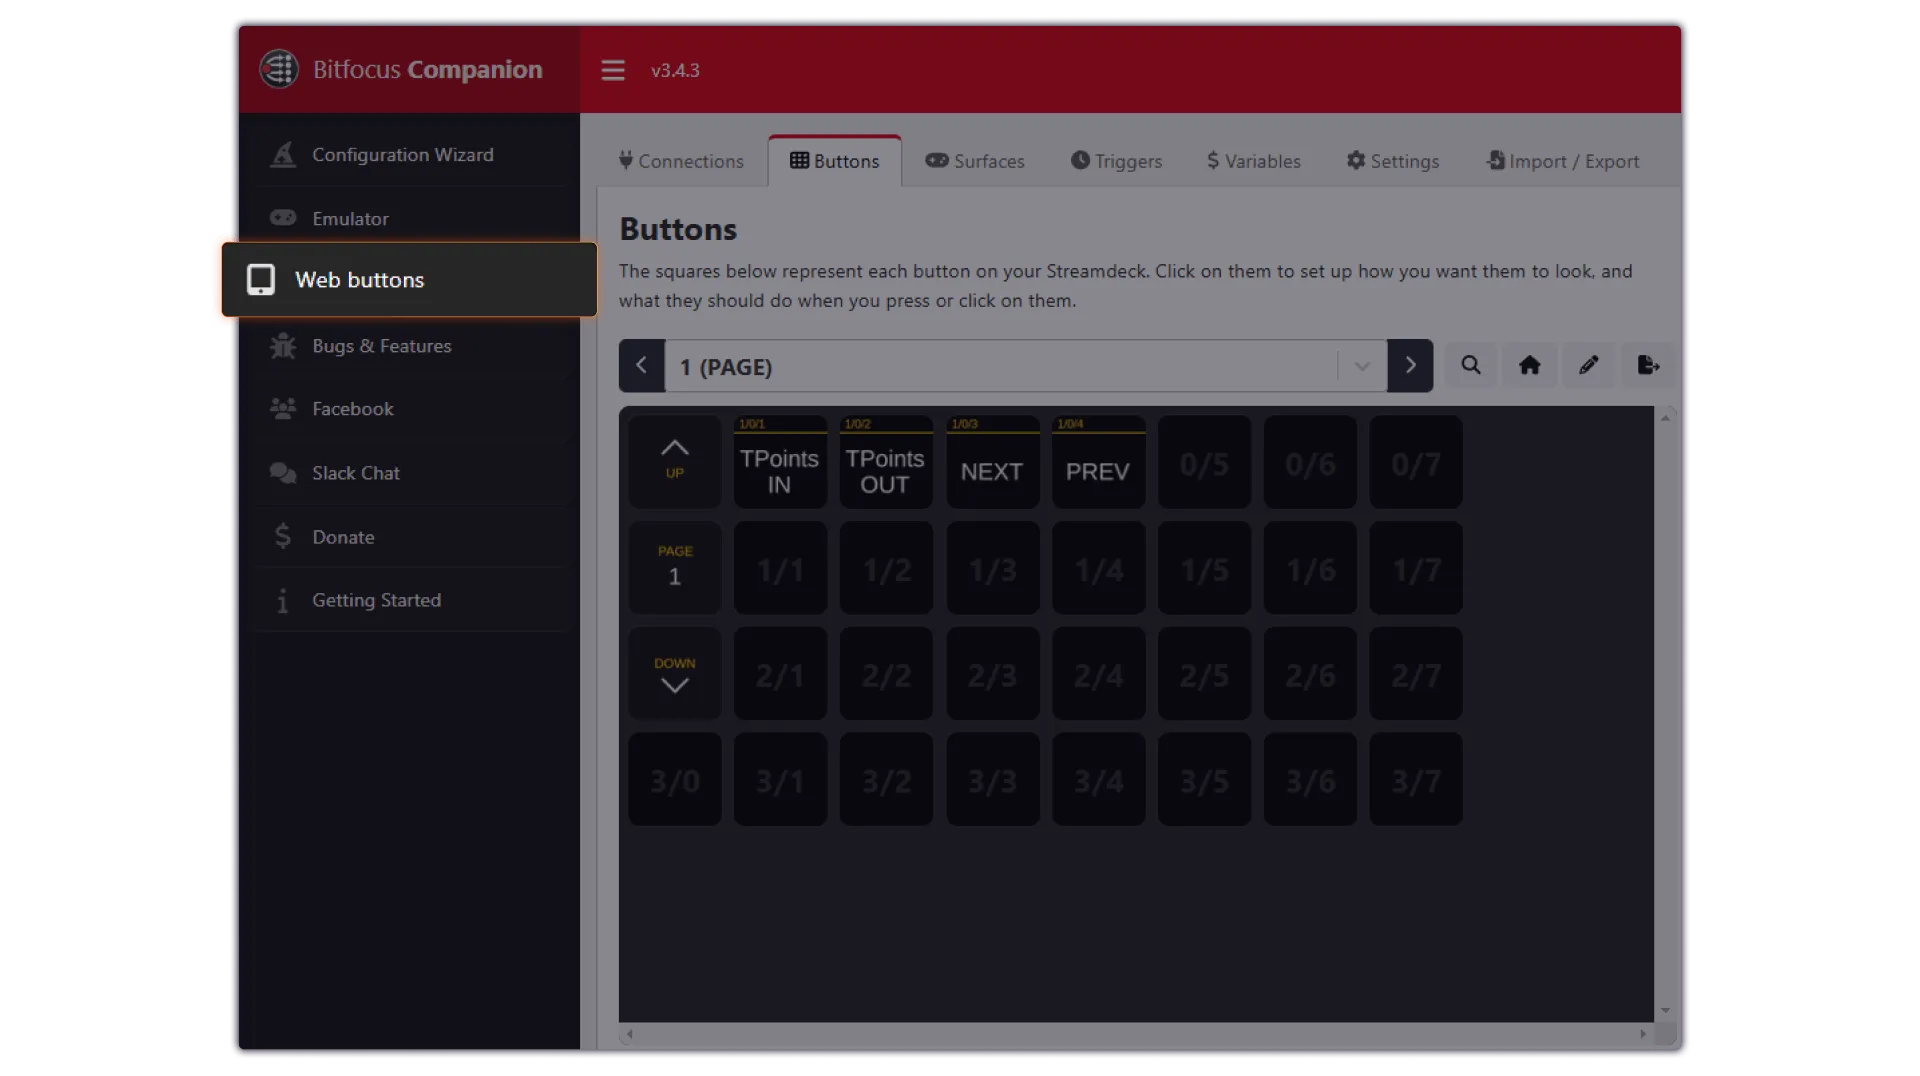
1. Haga clic en Botones en la pestaña del menú superior para navegar hasta sus botones y, a continuación, haga clic en un cuadrado del panel para seleccionar y editar un botón.
2. Abre el navegador de acciones haciendo clic en el icono del archivo situado debajo de «Acciones de prensa».

3. Seleccione el método PUT en el menú desplegable.

4. Defina la solicitud PUT.
Por ejemplo, si quieres animar en la superposición del tercio inferior del paquete de streaming, pega el siguiente cuerpo de la solicitud:
{"command":"ShowOverlay","id":"f62741ea-7de0-468d-ad98-6a778bb5eeae"}Puedes empezar usando cualquiera de los comandos que hemos enumerado en los ejemplos anteriores o escribiendo tu propio texto.
Puede comprobar si la configuración funciona correctamente haciendo clic en los botones web que muestran el menú a la izquierda de la pantalla.
Si necesitas ayuda para usar una API de la aplicación Uno con el software Bitfocus Companion Stream Deck, ponte en contacto con el equipo de uno en nuestro canal oficial de Discord. También puedes consultar nuestras otras guías en uso de Bitfocus Companion, incluida la forma de usar Compañero para intercambiar entre uno y otro slot.

